
No Bake Oreo Pie
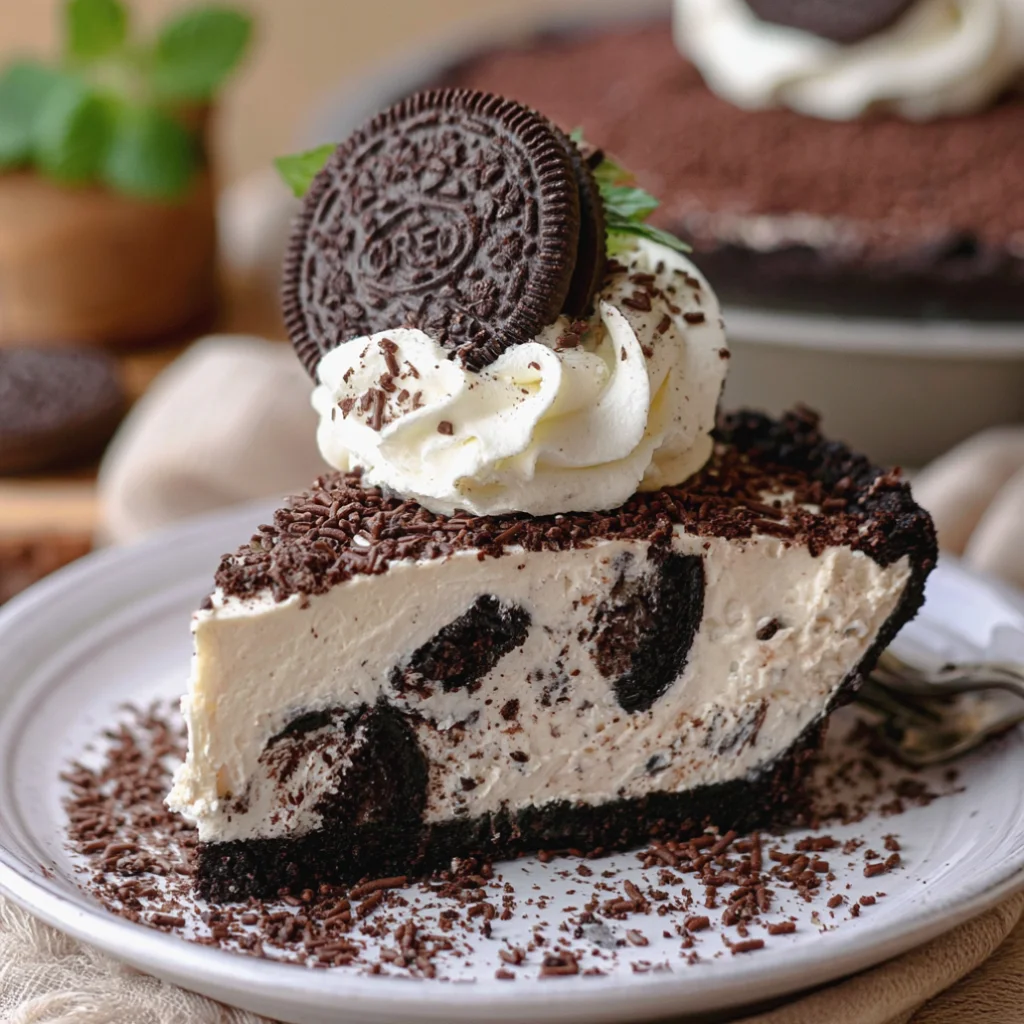
Indulge in the rich and creamy delight of a No Bake Oreo Pie, perfect for any occasion. This dessert combines the classic flavors of Oreos with a luscious cream cheese filling, making it an easy no bake dessert recipe that is sure to please everyone, especially kids. With minimal effort, you can create a stunning dessert that requires no baking, allowing you to spend more time enjoying the company of your guests. This pie is not only delicious but also visually appealing, making it a fantastic centerpiece for gatherings, parties, or family dinners. Its gorgeous layers and tempting flavors will have everyone coming back for seconds. Let’s dive into this delicious recipe!
Ingredients
- For the crust:
- 24 Oreo cookies, crushed into fine crumbs. Ensure they are finely crushed to achieve a uniform texture that holds together well. You can use a food processor for a quick and efficient result.
- 1/4 cup unsalted butter, melted. Using unsalted butter allows you to control the saltiness of the pie, enhancing the flavor without overpowering the sweetness. Make sure the butter is fully melted for an even mix.
- For the filling:
- 8 oz cream cheese, softened. It’s crucial that the cream cheese is at room temperature to blend smoothly without lumps, giving the filling a creamy and luxurious texture.
- 1/2 cup powdered sugar. This ingredient sweetens the filling and contributes to a silky texture. Sifting the powdered sugar can help eliminate any lumps before mixing.
- 1 tsp vanilla extract. Using pure vanilla extract enhances the overall flavor profile of the filling, imparting a warm and inviting aroma.
- 1 cup heavy whipping cream. Whipping cream should be cold for the best volume; this will help create a light and airy filling, contributing to the overall fluffiness of the pie.
- For the topping:
- 1/2 cup whipped topping (store-bought or homemade). Choose a high-quality whipped topping for the best flavor, or make your own for a fresh taste.
- Additional crushed Oreos for garnish. This not only adds texture but also enhances the visual appeal of the pie, making it even more enticing to your guests.
Note: For a gluten-free version, use gluten-free Oreos. If you prefer a lighter option, consider using low-fat cream cheese. You can learn more about this topic. Additionally, if you’re looking for an alternative to sugar, you can substitute the powdered sugar with a sugar-free sweetener, keeping in mind that this may slightly alter the texture. Fresh ingredients will always yield the best flavor, so opt for high-quality products whenever possible.
Steps / Instructions
- Prepare the crust: In a medium bowl, combine the crushed Oreo cookies and melted butter. Mix until the crumbs are evenly moistened, ensuring that every crumb is coated for a cohesive crust. This step is crucial for achieving a sturdy base that will hold the filling well.
- Form the crust: Press the mixture firmly into the bottom and up the sides of a 9-inch pie dish. Use the back of a measuring cup or your fingers to ensure it’s compact and even. It should feel solid to the touch. Place the crust in the refrigerator to chill for about 15 minutes, allowing it to set and hold its shape securely.
- Make the filling: In a large mixing bowl, beat the softened cream cheese with an electric mixer until smooth and creamy, which should take about 2-3 minutes. Gradually add the powdered sugar and vanilla extract, mixing until fully incorporated and no lumps remain, creating a silky filling that will melt in your mouth.
- Whip the cream: In a separate bowl, whip the heavy cream until stiff peaks form. This usually takes about 3-5 minutes; you will know it’s ready when the cream holds its shape when you lift the beaters. The whipped cream should be fluffy and airy, a key element in achieving the perfect texture for your filling.
- Combine mixtures: Gently fold the whipped cream into the cream cheese mixture using a spatula. Be careful to maintain the light and airy texture, mixing just until combined to avoid deflating the whipped cream. The goal is a harmonious blend that is light yet rich.
- Fill the crust: Pour the cream cheese filling into the chilled Oreo crust, spreading it evenly with a spatula. Make sure to smooth the top for an elegant finish, creating a beautiful presentation that your guests will appreciate.
- Chill: Cover the pie with plastic wrap and refrigerate for at least 4 hours, or until the filling is set. For best results, chill overnight as this allows the flavors to meld and the filling to firm up perfectly, enhancing the overall taste of your No Bake Oreo Pie.
- Add the topping: Before serving, spread the whipped topping over the pie and sprinkle additional crushed Oreos on top for garnish. This adds a nice visual contrast and enhances the Oreo flavor, creating a delightful experience for each bite.
- Serve: Slice and enjoy your delicious No Bake Oreo Pie! Serve it chilled for the best experience, and consider offering a drizzle of chocolate sauce on the side for an extra treat. You can also serve it with fresh fruit for a refreshing accompaniment.
Tips & Tricks
- Storage: Keep any leftovers covered in the refrigerator for up to 3 days. The pie can also be frozen for up to a month; just make sure to wrap it tightly in plastic wrap and store it in an airtight container to prevent freezer burn. Thaw in the refrigerator before serving to maintain its texture.
- Make ahead: This pie is perfect for preparing in advance. Make it a day ahead and let it chill overnight for the best flavor and texture. The longer it sits, the more the flavors develop, resulting in an even more indulgent dessert.
- Avoid common mistakes: Make sure your cream cheese is at room temperature to avoid lumps in your filling. Also, fold the whipped cream gently to keep the mixture light and fluffy; overmixing can lead to a dense filling that doesn’t have the desired airy quality.
- Pro tip: For an extra touch, drizzle some chocolate sauce on top before serving, or even mix in mini chocolate chips into the filling for added texture. You can also serve this pie with fresh berries for a refreshing contrast to the rich creaminess, making each serving feel special.
Variations
For those looking to customize their No Bake Oreo Pie, consider these options: Check out our related guide for more tips. Each variation adds a unique twist to the classic recipe while maintaining that beloved Oreo flavor.
- Mint Oreo Pie: Use Mint Oreos instead of regular Oreos for a refreshing twist, perfect for mint lovers. This variation is especially delightful in warmer months.
- Peanut Butter Oreo Pie: Mix in 1/2 cup of creamy peanut butter into the filling for a nutty flavor that pairs beautifully with the Oreos. This combination creates a decadent dessert that peanut butter enthusiasts will adore.
- Vegan Version: Substitute cream cheese with a vegan cream cheese alternative and use coconut cream in place of heavy whipping cream for a deliciously dairy-free dessert. This option allows everyone to enjoy a slice of this delightful pie regardless of dietary restrictions.
No Bake Oreo Pie
Indulge in the rich and creamy delight of a No Bake Oreo Pie, perfect for any occasion. This dessert combines the classic flavors of Oreos with a luscious cream cheese filling, making it an easy no bake dessert recipe that is sure to please everyone, especially kids.
Ingredients
- 24 Oreo cookies, crushed into fine crumbs
- 1/4 cup unsalted butter, melted
- 8 oz cream cheese, softened
- 1/2 cup powdered sugar
- 1 tsp vanilla extract
- 1 cup heavy whipping cream
- 1/2 cup whipped topping (store-bought or homemade)
- Additional crushed Oreos for garnish
Directions
In a medium bowl, combine the crushed Oreo cookies and melted butter. Mix until the crumbs are evenly moistened.
Press the mixture firmly into the bottom and up the sides of a 9-inch pie dish. Place the crust in the refrigerator to chill for about 15 minutes.
In a large mixing bowl, beat the softened cream cheese with an electric mixer until smooth and creamy. Gradually add the powdered sugar and vanilla extract, mixing until fully incorporated.
In a separate bowl, whip the heavy cream until stiff peaks form.
Gently fold the whipped cream into the cream cheese mixture using a spatula.
Pour the cream cheese filling into the chilled Oreo crust, spreading it evenly.
Cover the pie with plastic wrap and refrigerate for at least 4 hours, or until the filling is set.
Before serving, spread the whipped topping over the pie and sprinkle additional crushed Oreos on top.
Slice and enjoy your delicious No Bake Oreo Pie!
Recipe Reviews
- ★★★★★
Excellent recipe!
Leave a Reply
Your email address will not be published. Required fields are marked *












Excellent recipe!