
Easy Homemade Uncrustables Sandwiches
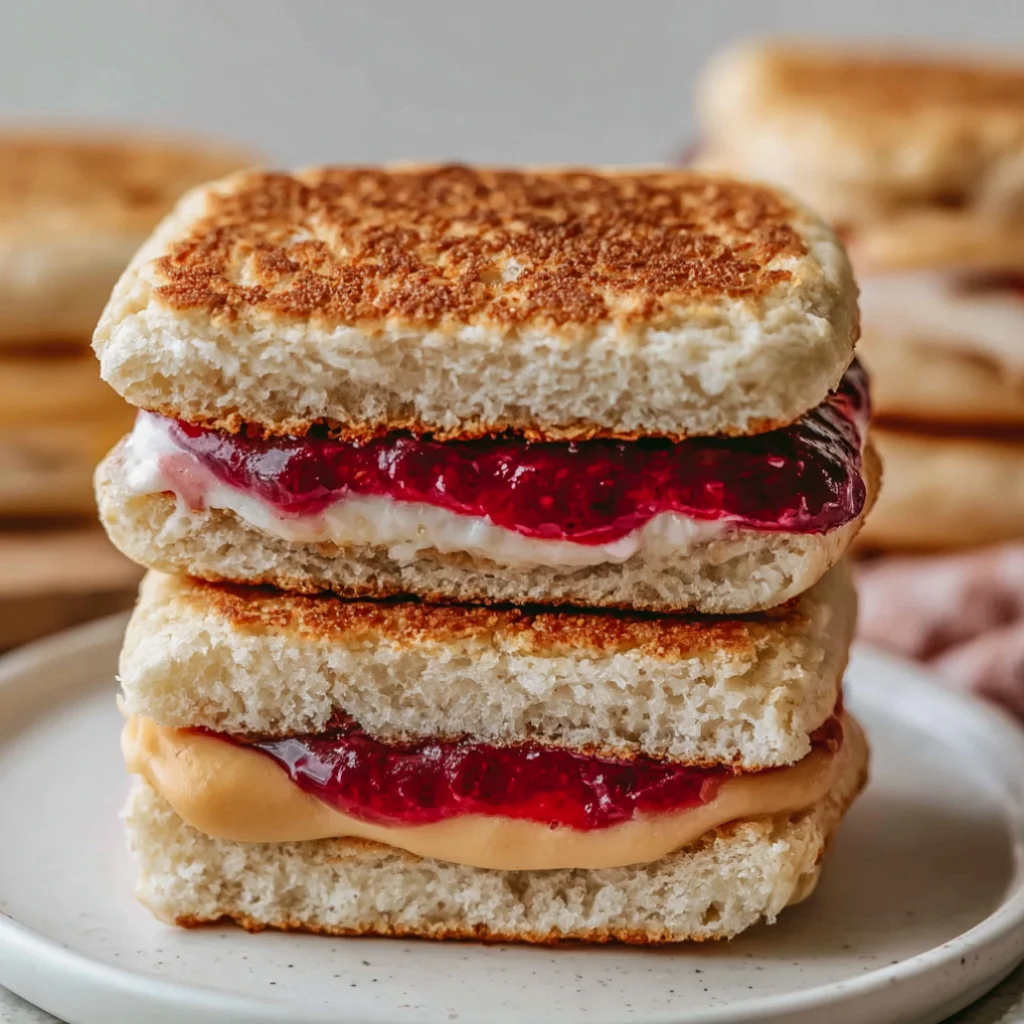
Making Easy Homemade Uncrustables Sandwiches is a delightful way to create a kid-friendly lunch that’s both fun and nutritious. These no-crust sandwiches are not only simple to prepare but also customizable, allowing you to cater to your children’s tastes and dietary needs. Perfect for school lunches, picnics, or quick snacks, these DIY Uncrustables will become a staple in your household. The beauty of this recipe lies in its versatility, giving you the freedom to experiment with different flavors and combinations that suit your family’s preferences. Whether you prefer classic peanut butter and jelly or a more adventurous filling, the possibilities are endless.
Ingredients
- Bread:
- 8 slices of whole wheat or white bread (choose good quality, fresh bread). For a heartier option, you can opt for multigrain or sourdough bread, which adds more flavor and texture. Ensure the bread is soft for easy spreading and to avoid stale bites.
- Peanut Butter:
- 1/2 cup creamy or crunchy peanut butter (natural peanut butter is a healthier option). Look for options with minimal ingredients, ideally just peanuts and salt, to avoid added sugars and preservatives. You may also consider organic varieties for better quality.
- Jelly:
- 1/2 cup grape or strawberry jelly (feel free to use low-sugar varieties). Consider using homemade fruit spread for a fresher taste, which often contains fewer additives and can enhance the overall flavor of your Easy Homemade Uncrustables Sandwiches.
- Optional Ingredients:
- Honey or maple syrup (for added sweetness). A drizzle of honey can enhance the flavor profile without relying on processed sugars, making it a great option for sweetening your sandwiches naturally.
- Nutella or almond butter (for alternative spreads) – these can introduce unique flavor combinations that kids will enjoy. Almond butter is also rich in healthy fats, adding nutritional value.
- Banana slices, fruit preserves, or even savory fillings like hummus (for creative combinations) are great ways to add nutrition and variety to your sandwiches. You might even consider adding a sprinkle of chia seeds for an extra health boost.
Steps / Instructions
- Start by laying out your slices of bread on a clean surface. You can use a cutting board or a large plate for this. Make sure your workspace is organized to streamline the process, as a tidy area will help avoid any mess.
- Using a knife or a spatula, spread a generous layer of peanut butter on four of the bread slices. Make sure to spread it evenly all the way to the edges to ensure a delicious bite every time. Aim for about 2 tablespoons of peanut butter per slice, adjusting based on personal preference. For an even more delectable texture, you can warm the peanut butter slightly to make it easier to spread.
- On top of the peanut butter, apply a layer of jelly or jam, also spreading it to the edges. This will create a delightful combination of flavors that your kids will love. Use the same amount of jelly as peanut butter for a balanced taste, ensuring that the sweetness complements the richness of the peanut butter.
- Take the remaining four slices of bread and place them on top of the jelly-covered slices, creating a sandwich. Make sure to align the edges for a clean, professional-looking finish. Gently press down to help the fillings adhere together before moving to the next step.
- Using a round cookie cutter or a glass, carefully cut out the crusts of the sandwiches. This not only removes the crust but also gives the sandwiches a fun, uniform shape that’s appealing to kids. If you don’t have a cutter, you can simply trim the crusts with a knife, ensuring the sandwiches remain intact.
- To seal the edges of the sandwiches, press down gently with your fingers or use a fork to crimp the edges. This prevents the filling from leaking out, making them perfect for lunchboxes. Ensure the seal is tight but not so forceful that you squish the filling out, allowing for a satisfying bite.
- Optional: If you want to make a large batch, you can prepare multiple sandwiches and store them in the freezer. Wrap each sandwich tightly in plastic wrap or place them in a freezer-safe bag. Label the bags with the date to keep track of freshness, ensuring you use them within a reasonable time frame.
- When ready to eat, simply remove from the freezer and let them thaw for about 30 minutes or until soft. For quicker thawing, you can place them in the refrigerator the night before, allowing the flavors to meld while they thaw.
Tips & Tricks
- Storage: Keep leftover sandwiches in an airtight container in the refrigerator for up to three days. If freezing, they can last for up to two months. To avoid freezer burn, ensure they are well-wrapped, and consider using parchment paper to separate layers if stacking.
- Make-Ahead: Prepping these sandwiches on a Sunday can save valuable time during busy weekdays. Just take them out of the freezer the night before for a quick, easy lunch option. You can even prepare various flavor combinations to keep it interesting. This is especially useful for busy families who value convenience.
- Avoiding Mistakes: Be sure to spread the peanut butter and jelly to the edges to avoid leakage. Also, pressing down firmly on the edges helps seal them properly. If you notice any gaps, you can re-seal them with a little more peanut butter or jelly, ensuring every bite is filled with deliciousness.
- Experiment: Don’t hesitate to try different fillings. Swap peanut butter for sunbutter or create savory versions with cheese and turkey. The possibilities for customizable sandwich fillings are endless! You might even try adding a sprinkle of cinnamon or cocoa powder for a unique twist, or incorporate diced fruits for added sweetness and flavor.
Variations
For those with dietary restrictions, there are plenty of options: You can learn more about this topic. This recipe can easily be adapted to fit various dietary needs.
- Vegan: Substitute peanut butter with almond butter or cashew butter and use fruit preserves without gelatin. Consider using whole grain or gluten-free bread for a healthier option, making it accessible for everyone.
- Gluten-Free: Use gluten-free bread to ensure everyone can enjoy these delicious sandwiches. Be sure to check the labels for any potential cross-contamination, ensuring a safe meal for those with gluten allergies.
- Creative Combinations: Try using chocolate hazelnut spread with banana slices for a sweet treat or savory fillings like cream cheese and cucumber for a twist. Mixing different types of jelly or adding chopped nuts can also elevate the flavors, providing a delightful crunch and taste.
Serving Suggestions
Serve your Easy Homemade Uncrustables Sandwiches alongside fresh fruit, yogurt, or a small handful of nuts for a balanced meal. Pair with a refreshing drink like homemade lemonade or a smoothie for a delightful lunch experience. Let your children explore different food pairings to discover their favorites, perhaps adding a side of carrot sticks or cucumber slices for a crunchy contrast. Check out our related guide for more tips on creative serving ideas and delicious accompaniments. Presentation matters, so consider using fun plates or arranging the sandwiches in creative ways to make lunchtime exciting.
Easy Homemade Uncrustables Sandwiches
Making Easy Homemade Uncrustables Sandwiches is a delightful way to create a kid-friendly lunch that’s both fun and nutritious. These no-crust sandwiches are not only simple to prepare but also customizable, allowing you to cater to your children's tastes and dietary needs.
Ingredients
- 8 slices of whole wheat or white bread
- 1/2 cup creamy or crunchy peanut butter
- 1/2 cup grape or strawberry jelly
- Honey or maple syrup (optional)
- Nutella or almond butter (optional)
- Banana slices, fruit preserves, or savory fillings like hummus (optional)
Directions
Start by laying out your slices of bread on a clean surface.
Spread a generous layer of peanut butter on four of the bread slices.
On top of the peanut butter, apply a layer of jelly or jam.
Take the remaining four slices of bread and place them on top of the jelly-covered slices.
Using a round cookie cutter or a glass, carefully cut out the crusts of the sandwiches.
To seal the edges of the sandwiches, press down gently with your fingers or use a fork to crimp the edges.
Optional: Prepare multiple sandwiches and store them in the freezer.
When ready to eat, simply remove from the freezer and let them thaw.
Recipe Reviews
- ★★★★★
Excellent recipe!
Leave a Reply
Your email address will not be published. Required fields are marked *


Excellent recipe!